Showing posts with label VirtualBox. Show all posts

Monday, January 23, 2012

[Guide] Mac OS X 10.7 Lion on VirtualBox with Windows 7 and Intel PC


Finally I managed to find out the working method to install and run latest Mac OS X 10.7 Lion on Oracle VirtualBox with normal Intel computer. The main issue every hackintosh users faced with Lion, is the boot loader to start the installation in normal PC or in any desktop virtualization software. Here I explain and demonstrate step by step method to install Mac OS X 10.7 Lion on VirtualBox in Windows 7 host Intel computer.
Please note this is just for testing and learning purpose only. This method is not recommended for production or long term use, also not all applications will be working on Mac Lion virtual machine as its not recommended by Apple company. Highly advisable to go with original Apple hardware and Mac OS to get the all features and power of Mac.
OK, I demonstrate these steps in my Windows 7 32 Bit computer with Oracle VirtualBox 4.1.2.

My PC Configurations.

Intel Core2Duo 2.66GHz, 3GB RAM on Host and Windows 7 32 Bit Operating System. Hardware Virtualization Technology (VT) is enabled in the host processor and processor is 64 bit ready.

What You Need?

1) Oracle VirtualBox 4.1 or later.  (Install the latest VirtualBox extension pack also)
2) The pre created Lion OS X installation disk. This is the very important part in this installation. The ordinary installation DMG file you download from Apple or any torrent sites will not work here. We need to modify some packages and create a new disk which can be booted in VirtualBox or VMware.
For this process, you must have a working Snow Leopard on physical or virtual machine.
The procedure is already covered in Sysprobs clearly, please check this guide on creating bootable Lion OS X disk.
The bootable Lion OS X disk can be created by two methods,
a) Create as a VMDK or VDI file. So this file can be attached to the virtual machine as the first disk to boot the Lion OS. This file can be used in VMware and VirtualBox whenever needed.
Follow the steps here to create bootable Lion OS X VMDK (or VDI) file.
b) Create an ISO file. This is also ideal method to use with all virtualization software and physical computer also.
One of my reader created a nice video on creating bootable Lion OS X ISO file from DMG.

3) Minimum 1GB memory to Virtual machine.
4) VT and 64bit supported processor. Check this guide and make sure your processor supports these features.
5) Download the boot loader which can boot the Lion OS in VirtualBox (HackBoot.iso which is uploaded by me, no virus.)

How to Install Lion OS X on VirtualBox

1) Double check the VT support and 64Bit in BIOS. If its not enabled, then enable it in BIOS and make sure the host Operating System is detecting it.
Check this guide on how to enable VT in BIOS
2) Create a new virtual machine. OS is Mac OS X , the version should be “64bit”. Do not ask me why, because normal 32bit version did not work on my computer.
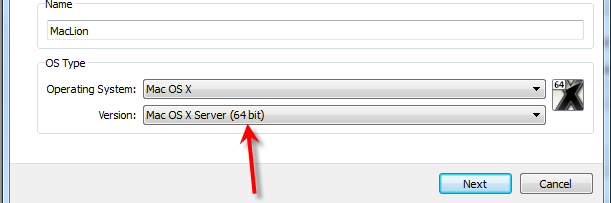
Lion OS X 64bit version
3) Set the memory size to 1GB or more than that, 2GB is recommended.
4) Create a virtual hard disk, minimum is 20GB.
5) Here is System settings.
You can deselect the floppy drive.
Make sure ‘Enable IO APIC” and others are selected as shown below.
Remove the Enable EFI option. Leave the ICH9 chipset as default.
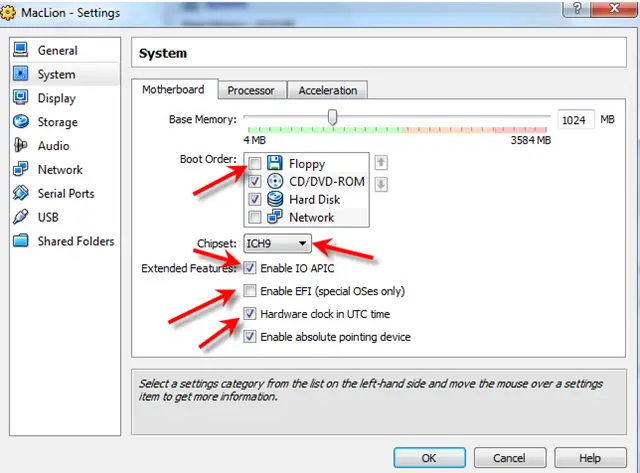
Mac OS X 10.7 System Settings in virtualbox
Under Acceleration, “Enable VT-x/AMD-V” and “Enable Nested Paging” should be enabled. If Acceleration tab is missing in your VirtualBox settings, it means VT is not enabled in host computer BIOS.
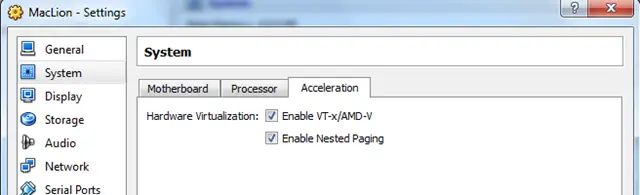
desktop virtualization software
Processor Settings.
This is slightly tricky. My processor is Core2Duo, so I could select 2 processors. Unfortunately during the installation the virtual machine crashed. I had to put it back to 1 processor (core). If you are using Intel i-series processor you can increase the number up to 4. Increase to maximum and try, if it doesn’t work then try with single core (1 processor).
6) Attach the bootable ISO or VMDK file to virtual machine. In all cases we have to set Hackboot.iso in CD drive and boot with it.
If you are trying to install with bootable VMDK file (which I did), here is the setup.
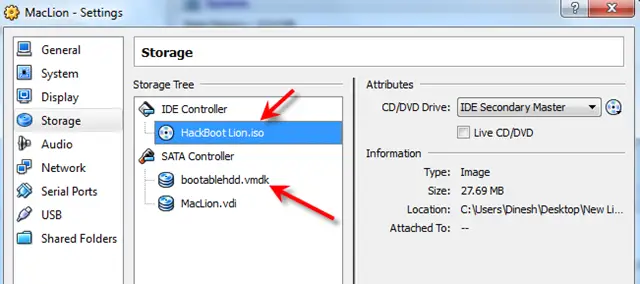
lion on virtualbox
If you are going to try with ISO file, then you do not need to add the ‘bootabelhdd.vmdk’ file.
7) Start the Lion OS X virtual machine now in VirtualBox.
It will boot with HackBoot.iso file.
If it’s from VMDK file, select the disk by pressing right arrow key in keyboard and press ENTER.
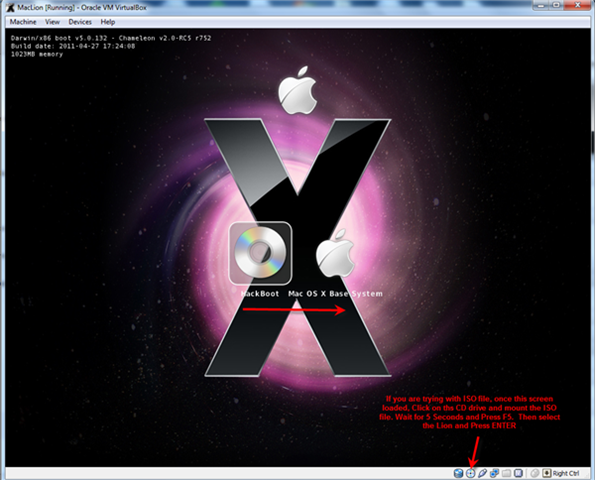
lion boot loader for virtualbox
If you are trying with ISO file, then once the above screen loaded, click on the CD icon of VirtualBox console and browse the Lion bootable ISO file. Wait for 5 seconds and press F5 to refresh the loaded CD, select it and press ENTER to start the installation.
8.) Are you lucky enough? The first screen should start normally. Select the language and continue.
9) If you do not see the virtual hard disk to install, then it should be created in Disk Utility during the installation. Click on ‘Utilities’ and select ‘Disk Utility’.
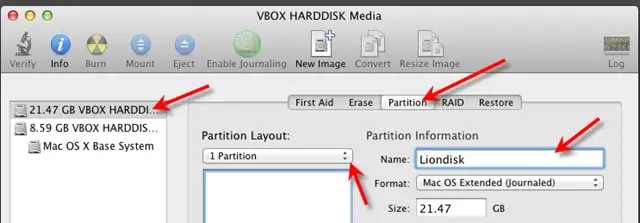
create partition to install
Press Apply and close the disk utility box. Now you should be able to see and select the newly created partition for installation. Select and begin the process.
10) After the installation automatic restart will be attempted but it will not work here. The virtual machine will stop with following screen which is ready for manual restart.
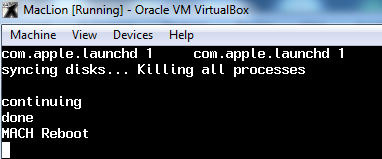
reboot screen
Reset the virtual machine from menu. It may give a guru meditation error sometimes. Do not worry, just close the virtual machine.
We need to start the VM now, so load the HackBoot.iso file again to CD drive if it was removed during the installation. Incase virtual machine hangs with ash color screen now, again restart.
11) After few initial settings, you must land on working Lion OS X desktop in VirtualBox.
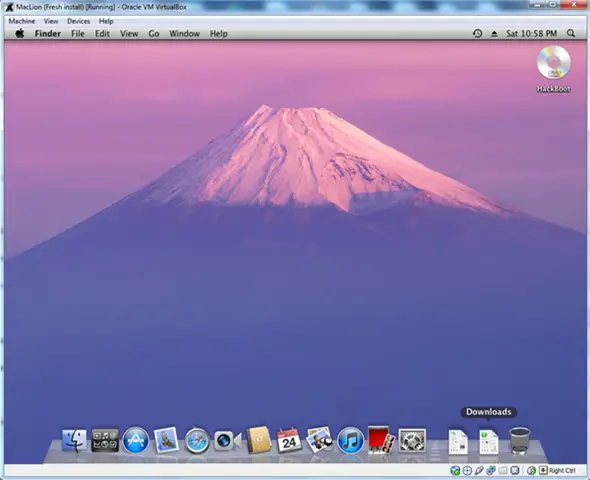
working lion os x in virtualbox
The performance of Lion OS X in VirtualBox is manageable. I could play around with few new changes and applications. Still there are few small drawbacks and issues on method. I will try my best to find out the solutions to fix them in future.

You must consider two issues now,

a) Shutting down and restart the Lion VM- This will not happen automatically. Once the black screen appears (Shown in Step 10), it’s safe to shutdown or reset from VirtualBox menu.
b) About the Mac – If you try ‘About the Mac’ inside virtual machine, it will not work. The virtual machine may crash.
I hope this guide would be helpful to install Mac OS X 10.7 Lion on VirtualBox with normal Intel computer with Windows 7, Vista or Windows XP. I’m NOT sure how this will work on AMD computer. Please someone leave comment about AMD processor.  Your responses are highly expected.
Have fun.

Sunday, January 22, 2012

,

How to Crack a Wi-Fi Network’s WEP Password with BackTrack


You already know that if you want to lock down your Wi-Fi network, you should opt for WPA encryption because WEP is easy to crack. But did you know how easy? Take a look.
If the network you want to test is running the more popular WPA encryption, see our guide to cracking a Wi-Fi network's WPA password with Reaver instead.
Today we're going to run down, step-by-step, how to crack a Wi-Fi network with WEP security turned on. But first, a word: Knowledge is power, but power doesn't mean you should be a jerk, or do anything illegal. Knowing how to pick a lock doesn't make you a thief. Consider this post educational, or a proof-of-concept intellectual exercise.
Dozens of tutorials on how to crack WEP are already all over the internet using this method. Seriously—Google it. This ain't what you'd call "news." But what is surprising is that someone like me, with minimal networking experience, can get this done with free software and a cheap Wi-Fi adapter. Here's how it goes.

What You'll Need

How to Crack a Wi-Fi Network's WEP Password with BackTrackUnless you're a computer security and networking ninja, chances are you don't have all the tools on hand to get this job done. Here's what you'll need:
  • A compatible wireless adapter—This is the biggest requirement. You'll need a wireless adapter that's capable of packet injection, and chances are the one in your computer is not. After consulting with my friendly neighborhood security expert, I purchased an Alfa AWUS050NH USB adapter, pictured here, and it set me back about $50 on Amazon. Update: Don't do what I did. Get the Alfa AWUS036H, not the US050NH, instead. The guy in this videobelow is using a $12 model he bought on Ebay (and is even selling his router of choice). There are plenty of resources on getting aircrack-compatible adapters out there.
  • A BackTrack 3 Live CD. We already took you on a full screenshot tour of how to install and use BackTrack 3, the Linux Live CD that lets you do all sorts of security testing and tasks. Download yourself a copy of the CD and burn it, or load it up in VMware to get started. (I tried the BackTrack 4 pre-release, and it didn't work as well as BT3. Do yourself a favor and stick with BackTrack 3 for now.)
  • A nearby WEP-enabled Wi-Fi network. The signal should be strong and ideally people are using it, connecting and disconnecting their devices from it. The more use it gets while you collect the data you need to run your crack, the better your chances of success.
  • Patience with the command line. This is an ten-step process that requires typing in long, arcane commands and waiting around for your Wi-Fi card to collect data in order to crack the password. Like the doctor said to the short person, be a little patient.

Crack That WEP

To crack WEP, you'll need to launch Konsole, BackTrack's built-in command line. It's right there on the taskbar in the lower left corner, second button to the right. Now, the commands.
First run the following to get a list of your network interfaces:
airmon-ng
The only one I've got there is labeled ra0. Yours may be different; take note of the label and write it down. From here on in, substitute it in everywhere a command includes (interface).
Now, run the following four commands. See the output that I got for them in the screenshot below.

airmon-ng stop (interface)
ifconfig (interface) down
macchanger --mac 00:11:22:33:44:55 (interface)
airmon-ng start (interface)
How to Crack a Wi-Fi Network's WEP Password with BackTrackIf you don't get the same results from these commands as pictured here, most likely your network adapter won't work with this particular crack. If you do, you've successfully "faked" a new MAC address on your network interface, 00:11:22:33:44:55.
Now it's time to pick your network. Run:
airodump-ng (interface)
To see a list of wireless networks around you. When you see the one you want, hit Ctrl+C to stop the list. Highlight the row pertaining to the network of interest, and take note of two things: its BSSID and its channel (in the column labeled CH), as pictured below. Obviously the network you want to crack should have WEP encryption (in the ENC) column, not WPA or anything else.
How to Crack a Wi-Fi Network's WEP Password with BackTrackLike I said, hit Ctrl+C to stop this listing. (I had to do this once or twice to find the network I was looking for.) Once you've got it, highlight the BSSID and copy it to your clipboard for reuse in the upcoming commands.
Now we're going to watch what's going on with that network you chose and capture that information to a file. Run:
airodump-ng -c (channel) -w (file name) --bssid (bssid) (interface)
Where (channel) is your network's channel, and (bssid) is the BSSID you just copied to clipboard. You can use the Shift+Insert key combination to paste it into the command. Enter anything descriptive for (file name). I chose "yoyo," which is the network's name I'm cracking.
How to Crack a Wi-Fi Network's WEP Password with BackTrack
You'll get output like what's in the window in the background pictured below. Leave that one be. Open a new Konsole window in the foreground, and enter this command:
aireplay-ng -1 0 -a (bssid) -h 00:11:22:33:44:55 -e (essid) (interface)
Here the ESSID is the access point's SSID name, which in my case is yoyo. What you want to get after this command is the reassuring "Association successful" message with that smiley face.
How to Crack a Wi-Fi Network's WEP Password with BackTrack
You're almost there. Now it's time for:
aireplay-ng -3 -b (bssid) -h 00:11:22:33:44:55 (interface)
Here we're creating router traffic to capture more throughput faster to speed up our crack. After a few minutes, that front window will start going crazy with read/write packets. (Also, I was unable to surf the web with the yoyo network on a separate computer while this was going on.) Here's the part where you might have to grab yourself a cup of coffee or take a walk. Basically you want to wait until enough data has been collected to run your crack. Watch the number in the "#Data" column—you want it to go above 10,000. (Pictured below it's only at 854.)
Depending on the power of your network (mine is inexplicably low at -32 in that screenshot, even though the yoyo AP was in the same room as my adapter), this process could take some time. Wait until that #Data goes over 10k, though—because the crack won't work if it doesn't. In fact, you may need more than 10k, though that seems to be a working threshold for many.
How to Crack a Wi-Fi Network's WEP Password with BackTrack
Once you've collected enough data, it's the moment of truth. Launch a third Konsole window and run the following to crack that data you've collected:
aircrack-ng -b (bssid) (file name-01.cap)
Here the filename should be whatever you entered above for (file name). You can browse to your Home directory to see it; it's the one with .cap as the extension.
If you didn't get enough data, aircrack will fail and tell you to try again with more. If it succeeds, it will look like this:
The WEP key appears next to "KEY FOUND." Drop the colons and enter it to log onto the network.


Problems Along the Way

With this article I set out to prove that cracking WEP is a relatively "easy" process for someone determined and willing to get the hardware and software going. I still think that's true, but unlike the guy in the video below, I had several difficulties along the way. In fact, you'll notice that the last screenshot up there doesn't look like the others—it's because it's not mine. Even though the AP which I was cracking was my own and in the same room as my Alfa, the power reading on the signal was always around -30, and so the data collection was very slow, and BackTrack would consistently crash before it was complete. After about half a dozen attempts (and trying BackTrack on both my Mac and PC, as a live CD and a virtual machine), I still haven't captured enough data for aircrack to decrypt the key.
So while this process is easy in theory, your mileage may vary depending on your hardware, proximity to the AP point, and the way the planets are aligned. Oh yeah, and if you're on deadline—Murphy's Law almost guarantees it won't work if you're on deadline.

To see the video version of these exact instructions, check out this dude's YouTube video.

Got any experience with the WEP cracking courtesy of BackTrack? What do you have to say about it? Give it up in the comments.